
Live Streaming
02/07/17 • 12 min
1. What components do I need for live streaming?
Getting started is pretty easy. Thanks to platforms like Facebook and YouTube, you can do it with a few clicks from your phone. But that won’t help you much when you want to up your production value. Here is what you need to get started.
Live Streaming from your CDN to end users
To successfully plan your setup, we need to work backward and follow the old credo of “begin with the end in mind”.
So, the last part of live streaming is “how do I get my video to viewers”? This is normally done through a CDN – a content delivery network. A content delivery network takes your video stream, and not only pushes it out to your legion of fans but also does things like create lower resolution variants, also called transcoding and transrating. A good CDN also supports different platforms, such as streaming to mobile devices and various computer platforms. A CDN also takes the load off of your streaming machine. Imagine your single CPU being tasked with sending out specific video streams in specific formats for every user?
OK, now that we have our CDN, we need to send a high-quality signal to it. I’ll address the specifics of that later in the episode, but suffice it to say, for a successful broadcast, you’ll need a decent Internet connection with plenty of headroom.
Live Streaming to a CDN
All CDNs will provide you with a protocol – that is, the way in which they want to receive the live feed for your broadcast. Now, this is different than the protocols that your end device will use – as a good CDN will take care of that mumbo jumbo translation for you....but only if you get the video to them in the right format.
These upload streaming formats can include HLS, RTSP, RTMP, and Silverlight formats. The end game is that your software needs to be able to stream to the CDNs mandated format for it to be recognized.
Speaking of software, this is one of the most critical decisions to make.
Will your streaming software ONLY stream, or will it also do production tasks as well, like switching between multiple sources, playing prerecorded video, adding graphics, and more? Of the utmost importance is “does your software support the camera types you’re sending it?”
Cameras to I/O device to Streaming Device
....which leads up to the beginning of your broadcast chain... “what kind of cameras are you using?” Are you using USB cameras? Or, are you using cameras with HDMI or HDSDI outputs? If the latter, then you need an I/O device on your computer which can not only take all of the inputs you want but also in the frame size and frame rate you want.
You’ll quickly see that the successful technical implementation of a live stream is based on each part playing with the others seamlessly.
A complete live streaming workflow
2. CDNs?!
In case I wasn’t clear, your CDN choice is one of the most critical decisions. Your CDN will dictate your end users experience.
Here are some things to look for in a CDN.
Does your CDN allow an end user a DVR like experience, where they can rewind to any point in the stream and watch? Does this include VOD options to watch later after the event is over?
Many CDNs have a webpage front end, where you can send users to watch the stream. However, most users prefer to take the video stream and embed it in their own website so they can control the user experience.
Also, “is this a private stream?’ If so, ensure your CDN has a password feature. Speaking of filtering viewers, does your CDN tie into your RSVP system – or, are you using your CDN’s RSVP system? This is another way to create a more personalized experience for the viewer – as well as track who watches – and get their contact info you can follow up with them after the event if needed....as well as track the streams metrics – so you can improve the content and experience for the next live stream.
CDN’s can’t do all of this for free. This is why most CDNs restrict video stream quality on free accounts. This means your upload quality may be throttled, or the end users viewing quality or even total viewer count may be lim...
Previous Episode
Post Production Myths Vol. 1
1. Transcoding to a better codec will improve quality
This is a very, very common question. It doesn’t matter what forum you contribute on, or troll on, this question is always asked. If I take my compressed camera footage, like an 8bit h.264, and convert it into a more robust codec, like 10bit ProRes or DNX – will it look better?
And it does topically make sense. If I put something small into something bigger, well, that’s better right? Unfortunately, the math doesn’t support this. Transcoding to a better codec won’t add quality that wasn’t there to begin with. This includes converting from an 8bit to a 10bit or greater source, or even converting from compressed color sampling value like 4:2:0 to something a bit more robust like 4:2:2.
Think of it this way.
Putting the same quality file into a larger file won’t make it visually “better”.
Imagine this glass of eggnog is sum quality of your original video. Adding rum or not is strictly your call. And you decide you want more of it. So, you pour the eggnog into a larger glass.
You’re not getting more eggnog, you’re just getting a larger container of the same amount of eggnog, and empty space not occupied by your eggnog is filled with empty bits.
What transcoding will do, however, is make your footage easier for your computer to handle, in terms of rendering and playback. Less compressed formats, like ProRes and DNX are easier for the computer to play than, say, an h.264. This means you can scrub easier in your timeline and render faster. Now, this is mainly due to long GOP vs non Long GOP which I discuss here.
In fact, if you wanna get REAL nitpicky, ProRes and DNX are NOT lossless codecs – they’re lossy, which means when you transcode using them, you will lose a little bit of information. You most likely won’t notice, but it’s there...or should I say, NOT there?
Interesting read. Click here.
Now, there is some validity to a unique situation.
Let’s say you shoot with a 4K camera. Perhaps it samples at 8bit color depth with 4:2:0 color sampling. By transcoding to a 1080p file, you can dither the color sampling to 4:4:4, and dither the sample depth to 10bit. However, as you’ve probably surmised, this comes at a loss of resolution – from 4K all the way down to HD.
More resources:
- CAN 4K 4:2:0 8-BIT BECOME 1080P 4:4:4 10-BIT? DOES IT MATTER?
- When 420 8bit becomes 444 10bit from Barry Green
- Discovery: 4K 8bit 4:2:0 on the Panasonic GH4 converts to 1080p 10bit 4:4:4
2. Log formats are the same as HDR
The two go hand in hand, but you can do one without the other. Let me explain.
HDR – when we talk about acquisition – Involves capturing material with a greater range of light and dark – stops – as well as color depth. It’s a combination of multiple factors. Shooting in a log format – whether it’s Slog, log-c, or another variant, is used to gain as much data as possible based on the limitations of the camera sensor.
So, let’s say you have a camera that only shoots in SDR – standard dynamic range – like Rec.709 – which has been the broadcast standard for almost 27 years.
But camera tech has gotten better in the last 27 tears. So, how do we account for this better ability of the camera within this aging spec? We can shoot in a log format. Log reallocates the limited range of the SDR of the camera’s sensor to the parts of the shot you need most. Log simply allows us to use more of the cameras inherent abilities.
So, while you get the extra abilities that the camera’s sensor allows, it doesn’t give you the complete HDR experience.
Now, if you shoot with a camera that isn’t constrained to Rec.709 and offers a log format – you now have the best of both worlds – greater dynamic range, and a format that allows you to exposure this extra realm of color possibilities.
3. You can grade video on a computer monitor
Next Episode
Transcoding in Post Production
1. Onset and Editorial Transcoding
When does Post actually begin?
Since we’ve moved from celluloid to digital, the answer to this query has quickly moved to production. In fact, over the past 20 years, a new position has emerged – the DIT, or Digital Imaging Technician, as a direct response to the need to coordinate between digital acquisition and subsequent post-production. In fact, the DIT is such an instrumental part of the process, that the DIT is often the liaison that connects production and post together.
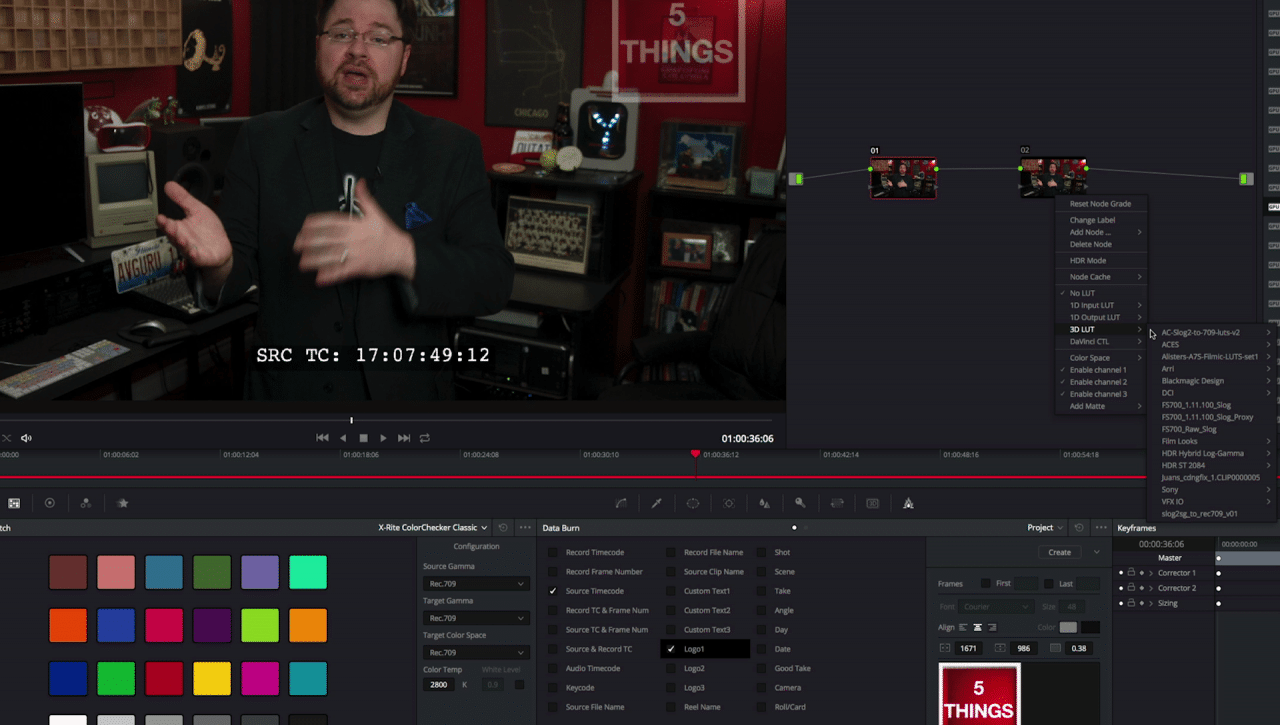
Adding a watermark, timecode window burn, and LUT inside Blackmagic Resolve
Now, this can vary depending on the size of the production, but the DIT will not only wrangle the metadata and media from the shoot and organize it for post, but they may have added responsibility. This can include syncing 2nd system audio to the camera masters. This may also include adding watermarks to versions for security during the dailies process or putting a LUT on the camera footage. Lastly, the DIT may also create edit ready versions – either high or low res – depending on your workflow. A very common tool is Blackmagic Resolve, but also tools like Editready, Cortex Dailies, or even your NLE.
Now, having the DIT do all of this isn’t a hard and fast rule, as often assistant editors will need to create these after the raw location media gets delivered to post. What will your production do? Often, this comes down to budget. Lower budget? This usually means that the assistants in post are doing a majority of this rather than the folk’s onset.
As for the creation of edit-ready media, this speaks to the workflow your project will utilize. Are you creating low res offline versions for editorial, and then reconforming to the camera originals during your online?
A traditional offline/online workflow
Or, are you creating a high res version that will be your mezzanine file that would work with throughout the creative process?
A mezzanine format workflow
OK, now on to actually creating edit-worthy media.
This can be challenging for several reasons.
You need to create media that is recognized by and optimized for the editorial platforms you’re cutting on. For Avid Media Composer, this is OPAtom MXF wrapped media. This media is commonly DNxHD, DNxHR and ProRes. What these have in common is that they are non-long GOP formats, which makes them easier for Avid to decode in real time.
The go-to has been the 20-year-old offline formats of 15:1, 14:1, or 10:1.
These formats are very small in size, are easy for computers to chomp through, but look like garbage. But if it means not spending money for larger storage or new computers, it’s tolerated. Recently, productions have been moving to the 800k and 2Mb Avid h.264 variants so they can keep larger frame sizes.
You can create this media through the import function, using dynamic media folders, or consolidate and transcode within Media Composer itself.
Adobe Premiere is a bit more forgiving in terms of formats. Premiere, like Avid, will work best with non
If you like this episode you’ll love


Episode Comments
Generate a badge
Get a badge for your website that links back to this episode
<a href="https://goodpods.com/podcasts/5-things-simplifying-film-tv-and-media-technology-audio-only-263286/live-streaming-31196481"> <img src="https://storage.googleapis.com/goodpods-images-bucket/badges/generic-badge-1.svg" alt="listen to live streaming on goodpods" style="width: 225px" /> </a>
Copy