Damien Parer
09/26/23 • 22 min
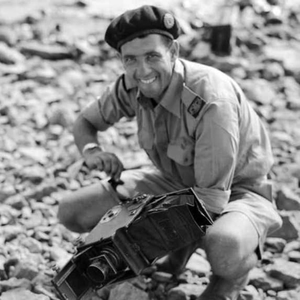
When the Second AIF headed to war, a little known photographer named Damien Parer was with them. Having made a reputation in the fledgling Australian film industry, Parer was selected as an official war photographer for the Department of Information. He would go on to record many of the iconic images of Australian troops in that war. But the bureaucracy of the DoI would eventually see Parer resign and take up a role with Paramount News, a move which would bring about his untimely death on the island of Peleliu.
https://www.australianmilitaryhistorypodcast.com/episodes
Hosted on Acast. See acast.com/privacy for more information.
Previous Episode
The Fall of Rabaul Part 2
With the port town of Rabaul captured by the Japanese, the men of Lark Force began their retreat. Two main escape routes developed, one to the north and the other to the south. All of the survivors experienced hardships over the coming weeks. Those who went north and came under the energetic leadership of Lt Appel were the lucky ones, being evacuated after only a few weeks. Those who headed south faced a much tougher trek, with some destined to fall victim to Japanese atrocities at the Tol Plantation.
Warning - contains description of the massacre at Tol.
https://www.australianmilitaryhistorypodcast.com/
Hosted on Acast. See acast.com/privacy for more information.
Next Episode
The Battle of Maryang San Part 1
In 1951 the combatant nations of the Korean War had finally come to the negotiating table, raising hopes that the Korean War would soon be over. But when negotiations broke down, the troops went back to fighting. General Van Fleet wanted the UN troops to advance and push the Chinese troops back. US troops pushed forward at Punchbowl, and shortly thereafter the 1st Commonwealth Division, including the 3rd Battalion, Royal Australian Regiment (3RAR) launched its attack on the Maryang San complex.
The first phase involved the attack on Hill 355 by the Kings Own Scottish Borderers and the Shropshire Light Infantry. 3RAR's role in this opening move was intended to be a supporting role, but when the Borderers and Shropshires were held up by heavy fire, C Company of 3RAR was sent in to help.
https://www.australianmilitaryhistorypodcast.com/
Hosted on Acast. See acast.com/privacy for more information.
If you like this episode you’ll love


Episode Comments
Generate a badge
Get a badge for your website that links back to this episode
<a href="https://goodpods.com/podcasts/australian-military-history-454345/damien-parer-61759176"> <img src="https://storage.googleapis.com/goodpods-images-bucket/badges/generic-badge-1.svg" alt="listen to damien parer on goodpods" style="width: 225px" /> </a>
Copy