
YouTube Tips And Tricks For Your Media
09/12/18 • 13 min
On this episode of 5 THINGS, I’ve got a few tricks that you may not know about that will help you upload, manage, and make YouTube do your bidding.
1. Upload Tricks
You probably have media on YouTube, and you probably think that after thousands of hours, you’ve mastered the ‘Tube. But there are some little-known upload tricks and workarounds, playback shortcuts, and voodoo that you may not even know that YouTube does.
Let’s start at the beginning. Let’s say you’ve got a masterpiece of a video, maybe it’s an uncle getting softballed in the crotch, maybe it’s your buddy taking a header down a flight of stairs, or maybe, just maybe it’s the cutest pet in the world. MINE.
Lucy: the cutest, bestest pet in the world.
...and the world needs to see it, right? And you export a totally-worth-the-hard-drive-space-huge-monster-master-file so you don’t lose 1 bit of quality.
And that’s OK.
Now, in actuality, it’s not the most efficient, but let’s save that existential technology discussion for another episode.
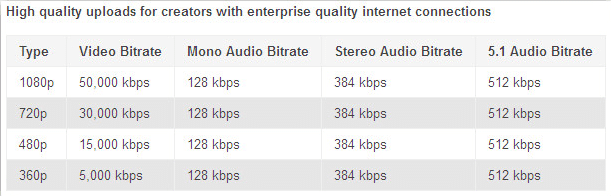
Did you know that YouTube will actually take this massive file? That you don’t need to shrink it, recompress it, or otherwise use the presets in your transcoder du jour? YouTube used to publish a page that specified video file sizes and data rates for “enterprise” grade connections. Ostensibly, this was so companies with fat internet connections could upload massive files. After all, YouTube re-compresses all files anyway. Yes, as I’ve said many times before, YouTube will ALWAYS recompress your media. ALWAYS.
“Enterprise” video bitrates for YouTube. These are 5-6x LARGER than what YouTube recommends for typical users.
But, this page was taken down.
Why?
Because accepting larger files sizes ties up YouTube’s servers, and takes longer for their transcoding computers to chomp through and subsequently create the versions you’ll end up watching. Plus, it’s a crappy experience for you, the end user, to wait hours for an upload AND the processing. Despite this, you can still do it. In the above video, you can see I have an HD ProRes file, and it’s several GB. As I select the file and start the upload, YouTube tells me this will take several hours. That sucks. However, uploading a less compressed file means the versions that YouTube creates will be based on higher quality than the compressed version you’d normally export and upload from your video editor or one that you’d create from your media encoder.
YouTube creates all of your media variants...so you don’t have to.
So what would you rather have...a copy of a copy of your finished piece? Or just 1 copy? The less compression you use, the better looking the final video will be.
More on this here: A YouTube user uploads, downloads and re-uploads the same video to YouTube 1000 times and the compression is staggering. This is called “generational loss”.
By the way, you know that YouTube creates all of your various versions, right? From the file you upload, YouTube creates the 240, 360, 480, 720, 1080 and higher versions. Are yours not showing up? Have patience. YouTube takes a little bit.
OK, back to the high res fat files. I know, the fact there is a long upload for these large files sucks, but it does lead me to the next tip. Did you know you can resume a broken upload? As long as you have the same file name, you can resume an upload for 24 hours after a failed upload. In the video above, let me show you. Here’s the file I was uploading before. As you can see, it still has quite a way to go. Oops, closed my tab. Now, I’m gonna wait a little bit.
OK, it’s been several hours, and I’m going to open a new tab and navigate back to the upload page. Now, I’ll reselect the same file. The upload picks up ...
On this episode of 5 THINGS, I’ve got a few tricks that you may not know about that will help you upload, manage, and make YouTube do your bidding.
1. Upload Tricks
You probably have media on YouTube, and you probably think that after thousands of hours, you’ve mastered the ‘Tube. But there are some little-known upload tricks and workarounds, playback shortcuts, and voodoo that you may not even know that YouTube does.
Let’s start at the beginning. Let’s say you’ve got a masterpiece of a video, maybe it’s an uncle getting softballed in the crotch, maybe it’s your buddy taking a header down a flight of stairs, or maybe, just maybe it’s the cutest pet in the world. MINE.
Lucy: the cutest, bestest pet in the world.
...and the world needs to see it, right? And you export a totally-worth-the-hard-drive-space-huge-monster-master-file so you don’t lose 1 bit of quality.
And that’s OK.
Now, in actuality, it’s not the most efficient, but let’s save that existential technology discussion for another episode.
Did you know that YouTube will actually take this massive file? That you don’t need to shrink it, recompress it, or otherwise use the presets in your transcoder du jour? YouTube used to publish a page that specified video file sizes and data rates for “enterprise” grade connections. Ostensibly, this was so companies with fat internet connections could upload massive files. After all, YouTube re-compresses all files anyway. Yes, as I’ve said many times before, YouTube will ALWAYS recompress your media. ALWAYS.
“Enterprise” video bitrates for YouTube. These are 5-6x LARGER than what YouTube recommends for typical users.
But, this page was taken down.
Why?
Because accepting larger files sizes ties up YouTube’s servers, and takes longer for their transcoding computers to chomp through and subsequently create the versions you’ll end up watching. Plus, it’s a crappy experience for you, the end user, to wait hours for an upload AND the processing. Despite this, you can still do it. In the above video, you can see I have an HD ProRes file, and it’s several GB. As I select the file and start the upload, YouTube tells me this will take several hours. That sucks. However, uploading a less compressed file means the versions that YouTube creates will be based on higher quality than the compressed version you’d normally export and upload from your video editor or one that you’d create from your media encoder.
YouTube creates all of your media variants...so you don’t have to.
So what would you rather have...a copy of a copy of your finished piece? Or just 1 copy? The less compression you use, the better looking the final video will be.
More on this here: A YouTube user uploads, downloads and re-uploads the same video to YouTube 1000 times and the compression is staggering. This is called “generational loss”.
By the way, you know that YouTube creates all of your various versions, right? From the file you upload, YouTube creates the 240, 360, 480, 720, 1080 and higher versions. Are yours not showing up? Have patience. YouTube takes a little bit.
OK, back to the high res fat files. I know, the fact there is a long upload for these large files sucks, but it does lead me to the next tip. Did you know you can resume a broken upload? As long as you have the same file name, you can resume an upload for 24 hours after a failed upload. In the video above, let me show you. Here’s the file I was uploading before. As you can see, it still has quite a way to go. Oops, closed my tab. Now, I’m gonna wait a little bit.
OK, it’s been several hours, and I’m going to open a new tab and navigate back to the upload page. Now, I’ll reselect the same file. The upload picks up ...
Previous Episode
Building a Hackintosh
Have you ever thought about using a Hackintosh? Wondering how they perform? Or maybe you wanna build one? Fear not my tech friends, for in this episode, we’ve got you covered.
1. Why Build a Hackintosh?
If you spend any amount of time following Apple, you’ve realized that they are a consumer technology juggernaut. Phones, tablets, watches, headphones. This has led some to speculate that Apple isn’t paying attention to the professional market.
That is, Apple isn’t making computers for those who need a lot of horsepower for creative applications, and expandability to make the system more powerful than what the factory model ships with...or what Apple deems us as worthy of.
We also need to look at the cost. The Apple logo carries a price premium, and without much exception, Apple computers are more expensive than their Windows or Linux counterparts. And while I concede that a ready-to-roll machine should cost more than the sum of its parts, Apple tends to inflate this more than most.
Another reason to build a Hackintosh....is, well, because it’s there. Because you can. Well, physically, anyway. I’m not a lawyer, and debating the legalities of building a Hackintosh is not my idea of an afternoon well spent. However, the tech challenge in and of itself is enough for some to dig in.
Lastly, owning a Hackintosh means you’ll at some point you’re gonna need troubleshoot the build due to a software update breaking things. If you don’t build it yourself, you’re not gonna know where the bodies are buried, and you’ll be relying on someone else to fix it.
For all of these reasons, I rolled up my sleeves, grabbed some thermal paste, and went down the road of building my very own Hackintosh.
2. Choosing the Right Parts
“Look before you leap.”
When building my Hackintosh, this was my cardinal rule. See what others had done before, what hardware and software junkies had deemed as humanly possible, and follow build guides. Although I was willing to build it, I didn’t want it to be a constant source of annoyance due to glitches, and then no avenue to search for answers if things went south. Part of building a Hackintosh is being prepared for things to break with software updates – and to only update after others had found the bugs. I wanted to keep the tinkering after the build to a minimum.
More createy, less fixey.
The main site online for a build like this is tonyxmac86.com. The site has tons of example builds, a large community on their forums, and even better, users who have done this a lot longer than me.
A great starting point is the “Buyer’s Guide” which has parts and pieces that lend themselves to the power than many Apple machines have. A CustoMac Mini, for example, is closely related to the horsepower and form factor you’d find with a Mac Mini.
As I tend to ride computers out for awhile, I decided to build a machine with some longevity.
Longevity meant building a more powerful machine, and thus as close as possible to a Mac Pro. And wouldn’t you know it, there is a section called “CustoMac Pro”.
The downside to a machine as powerful and expandable as a CustoMac Pro is that it’s fairly large. After I took inventory of all of the expansion cards I’d want to use, I realized I didn’t need everything that a CustoMac Pro afforded me. The large motherboard in the system – known as an ATX board, was simply overkill and was too large of a footprint for my work area. I could actually go with something a little bit smaller and still have plenty of horsepower.
So, I looked into the CustoMac mATX builds. M stands for Micro, and the mATX board would be similar to a full sized ATX board, but a bit smaller. I’d also lose some expandability with a smaller, micro ATX motherboard, but I could use the same processor that I would use in a full size build – in this case, a Core i7-8700...
Next Episode
Blackmagic eGPU Pro & 2018 Mac Mini vs. FCPX, Adobe Premiere Pro, DaVinci Resolve, and Avid Media Composer
On this episode of 5 THINGS, we’re checking out the 2018 Mac Mini from Apple, and the new eGPU Pro offering from Blackmagic and ...well, Apple. We’re also running benchmarks against your favorite (or least favorite) NLEs: Final Cut X, DaVinci Resolve, Adobe Premiere Pro, and Avid Media Composer. Let’s get to it.
NOTE: The eGPU Pro in this episode was a pre-release, beta model. Your results may vary with the shipping version.
1. 2018 Apple Mac Mini
What better machine to test how well an external GPU works than on a machine that has a horrible built-in GPU? Yes, tech friends, the powerful top of the line 2018 Mac Mini is built on Intel technology, which means there is a small GPU on the chip. While this GPU, the Intel UHD Graphics 630, isn’t going to break any performance records, it does provide a user with a basic way to feed their screen without a 3rd party graphics card.
The Mac Mini also rocks USB-C for Thunderbolt 3 access. It’s this 40Gb connection that provides the bandwidth for an eGPU to shine. Slower I/O, like Thunderbolt 2 or even older connections, simply don’t provide enough bandwidth to accommodate all that a modern GPU can provide. The new Mini provides four USB-C Thunderbolt 3 ports, enough for up to 2 eGPUs. I also dig the legacy USB 3 ports, too...as we all have peripherals like keyboards and mice that still rock the legacy USB type A.
Back to throughput, the 2018 Mac Mini also has an option for a 10GigE copper connection. I know, many signify 10GigE as a sign that it’s “for professionals”. Quite frankly, 10GigE is the new 1GigE, so if you haven’t been looking into it, now would be a good time.
The Mini has many different options, from an entry level i3 processor to the midrange i5, to the i7 model that l I tested with. The units can be configured with 4 or 6 cores, and speeds of up to 4.6GHz in Turbo Boost Mode. For RAM, the 2018 Mini supports up to 64GB, although you may need to take it to an Apple store to get it installed. You can also build your system out with up to a 2TB PCI SSD.
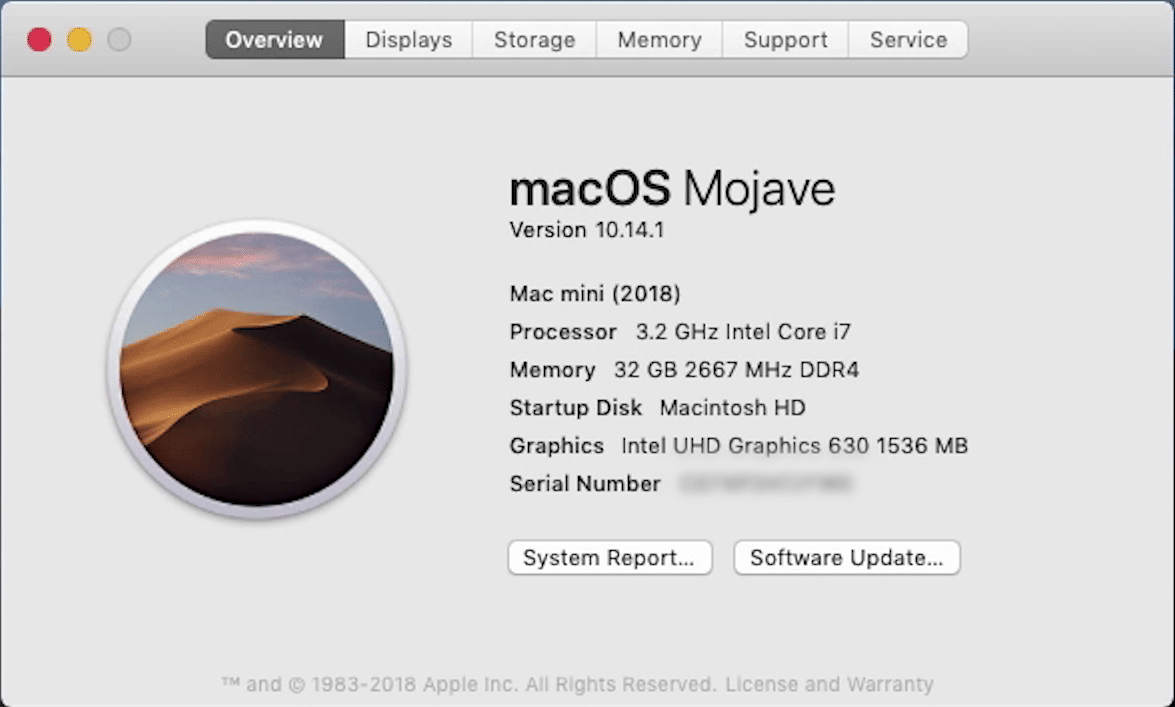
My testing unit was the 6 core i7, with 32GB of RAM.
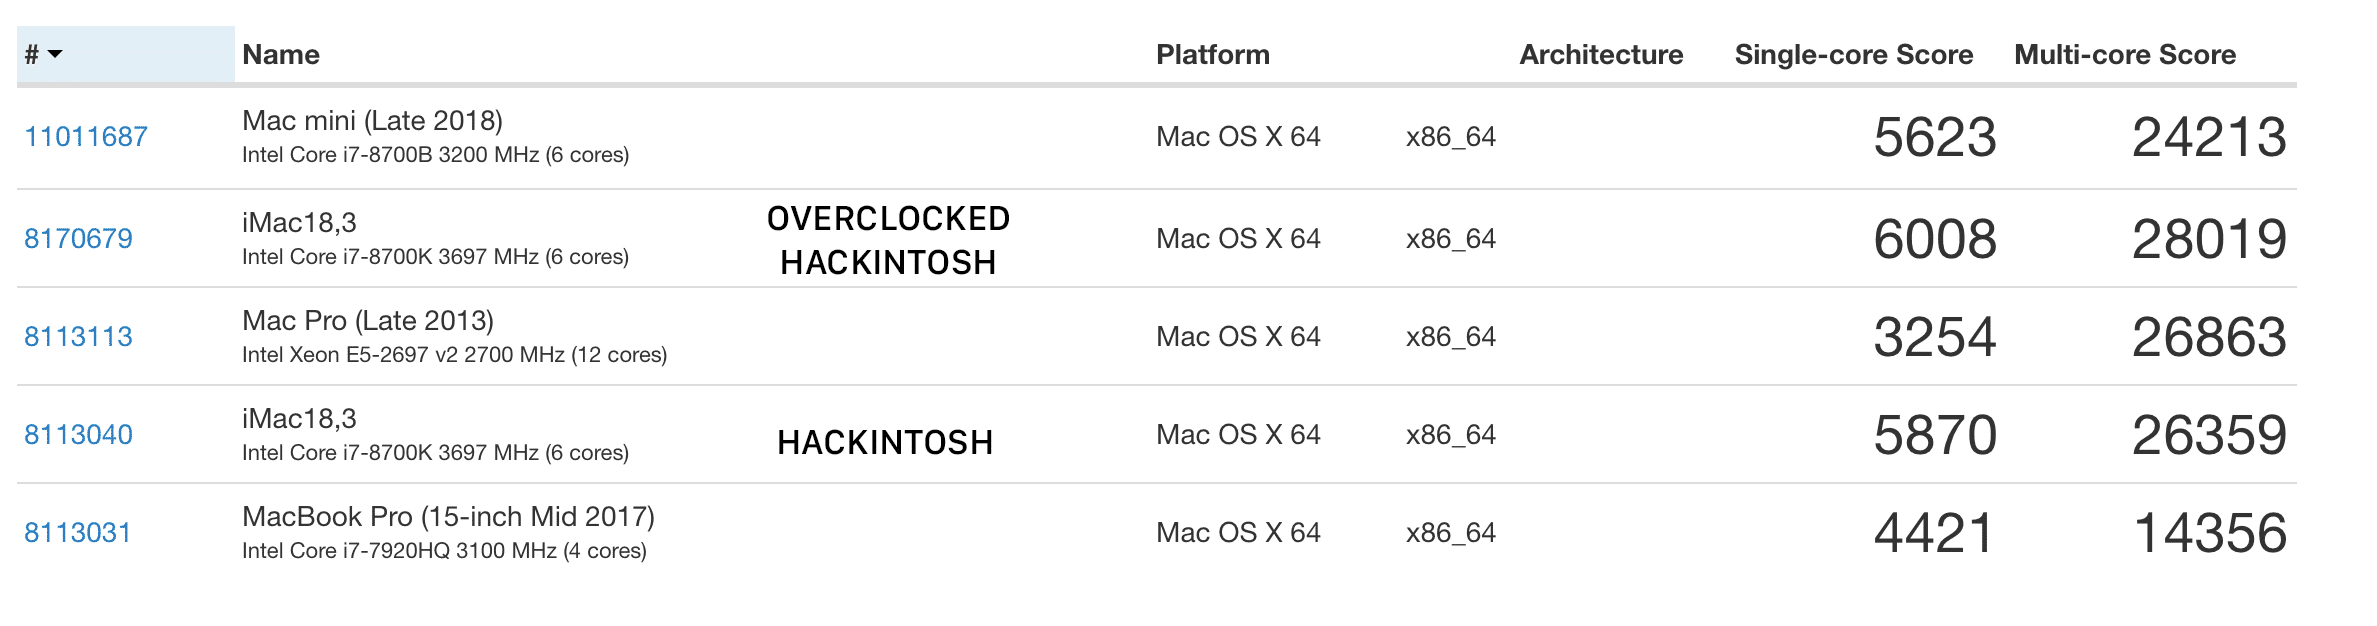
I ran some benchmarks on the Mini and compared the results with other Geekbench scores of other popular Apple machines.
Here, we have a top of the line 2013 Mac Pro, and a maxed out 2017 MacBook Pro, plus my Hackintosh build from a few episodes back. You can see the 2018 Mac Mini is apparently no slouch when it comes to performance. Plus, it helps that the last Mac Pro is over 5 years old, too.
Let that sink in for a minute.
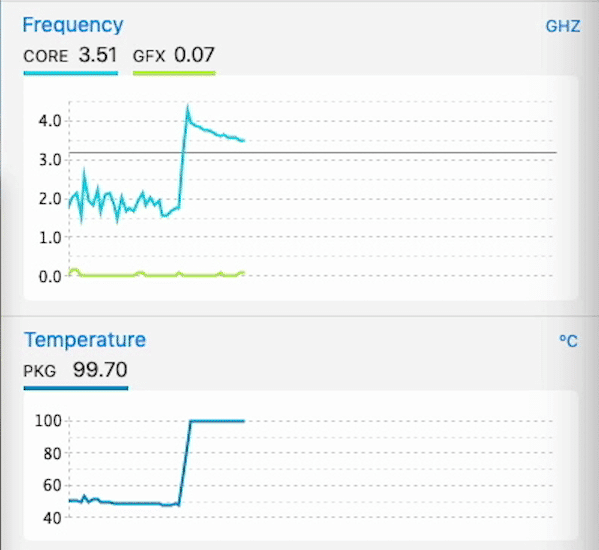
During testing, I was alerted to the fact that the Mini will throttle the chip speed when the unit hits 100 degrees (Celsius), so if you push the system too hard, the performance will suffer.
That kinda blows.
There are a ton of in-depth 2018 Mac Mini reviews out there, and let’s face it, you’re really here for the eGPU Pro and video post-production stuff...so let’s move onto that...now.
2. Blackmagic eGPU Pro
Like the non-pro model before it, the eGPU Pro from Blackmagic simplifies the addition of enhanced graphics processing by putting a GPU in an external enclosure. Also, like the previous model, the Pro has an 8GB card in it, albeit with a faster 8GB card than the Radeon Pro 580 in the previous gen. The new GPU is the Radeon RX Vega 56. Both models are meant to capitalize on the Metal playback engine, although they will ...
If you like this episode you’ll love


Episode Comments
Generate a badge
Get a badge for your website that links back to this episode
<a href="https://goodpods.com/podcasts/5-things-simplifying-film-tv-and-media-technology-audio-only-263286/youtube-tips-and-tricks-for-your-media-31196470"> <img src="https://storage.googleapis.com/goodpods-images-bucket/badges/generic-badge-1.svg" alt="listen to youtube tips and tricks for your media on goodpods" style="width: 225px" /> </a>
Copy