The Truth About Video Editing Software in Hollywood
07/12/17 • 17 min
NLE – Non linear editing – has been around for over 40 years, but it didn’t become common place in Hollywood – that is, being used for feature film and broadcast television – until the early 90’s. And that’s where we’ll start.
But before I start, I do need to set a disclaimer. I also work for Key Code Media, who sells many of the tech solutions that I talk about on 5 THINGS. And wouldn’t ya know it, we sell a heck of a lot of Avid and things that play with Avid...including Adobe, and Apple, for that matter. I don’t want any of you think I’m a paid shill, so I got clearance
from this guy...ya really gotta watch the video above to see.
1. Avid Media Composer
A large part of understanding one’s popularity is to examine WHY it’s popular. And that requires sharing the most brief of history lessons.
OK, do you remember a time before Internet connected cell phones? Now, try and remember how our daily lives changed when most everyone had one of these devices.
It was a definite shift in how we consumed media. Now, imagine that, only with the CREATION side of media. This was Hollywood in the early 90’s. Digital video cameras were still very new, and limited to standard definition. There were many companies toying with building digital editing software, but none really took hold. That is, until Avid Media Composer came along in the early 90’s.
By building a digital editing platform, based on the terminology and methodology the experienced film editors knew, Avid was able to make the industry adoption of their technology much easier. Thus, we already have 2 reasons Media Composer was popular: it appealed to the sensibilities of the user base, and it was one of the few solutions out there.
Avid also built around their ecosystem, including not only their own shared storage, but having the top audio editing system in the industry; Pro Tools, by then Digidesign, giving users a complete solution tech partner to work with. We call this the “one throat to choke” paradigm.
Many facilities already invested in a complete end-to-end Avid infrastructure.
By the time other NLE’s were in a useable state for film and TV projects, Avid had a massive head start. This meant a decent-sized user base in the Hollywood market, facility infrastructures (and thus lots of money already invested in hardware and software) that were built around Media Composer, in addition to workflows that incorporated both legacy film-based material, tape acquisition, and newer digital formats. Avid also had project sharing by the early 00’s, something that only recently other NLE’s getting right. For all of these reasons, Avid had the Hollywood market cornered. And all of this played into one of the greatest untold truths about Hollywood technology.
Hollywood is predominantly risk-averse.
If something worked last season, why change it for this season? Changing it messes with budgets and timelines and generally upsets the natives.
And that’s why today, Avid is still used on a vast majority of all feature films and broadcast television here in Hollywood. Existing customer investment in infrastructure, experienced talent pool – both available and already on staff, documented workflows with other departments, a complete ecosystem, and a risk-averse industry. If you plan on getting a job tomorrow out in Hollywierd, working in broadcast television or feature film, Media Composer needs to be your strongest software tool.
2. Apple Final Cut Pro X
Previous Episode
Prepping for Post Production Audio
Great to meet-up with folks at NAB 2017!
We’re back after a break for NAB. I’m still regaining my voice, and wanted to thank everyone who stopped and chatted with me at NAB....as well as attended or tuned in to the panels I was a part of plus the live episode of 5 THINGS thanks to Lumaforge. To everyone who reached out and chatted at the show, you ROCK. I love hearing from you. PLEASE, stay in touch.
Snap back to reality, and today we’re delving into what certainly sounds like a good topic, Prepping for post audio.
1. Track Layouts
How much time have you spent cleaning up problems and mistakes from onset? Or from other editors on your project? Often, audio folks have to do the same thing. Reorganizing work from the creative edit is usually the first step in post audio. You can help alleviate this in a few ways, and it will help you in your rough mix.
First, organize your audio. I know when it comes to video, you traditionally checkerboard your video, collapsing into as few tracks as possible. But when it comes to audio, we want extreme separation and organization. This means separating audio into the minimum of 3 categories, and thus sets of tracks.
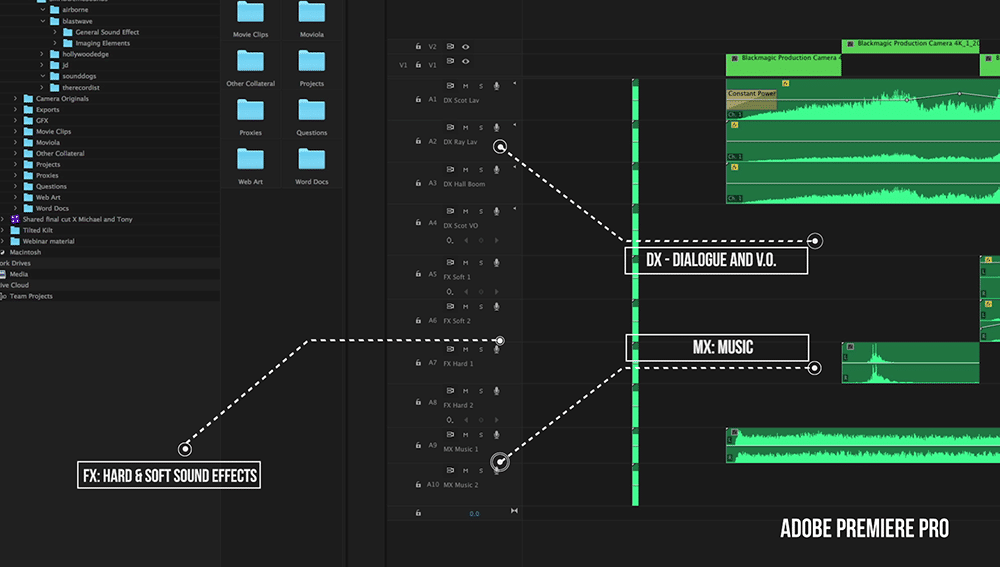
In post, we call these FX, MX, and DX, or Effects, Music, and Dialogue tracks. This is a good start, as audio folks routinely need to create stems, or isolated mixes, of each individual sound type. What is typically preferred, however, is to arrange even deeper. This would include audio tracks for each character’s dialogue, and separate tracks for voice over.
It may also include organization by sound effects types, like soft effects...such as ambiance, vs. hard effects, like a door slam. Not only does this help post audio, but it does allow you in video post to easily find and change the audio without soloing and hunting around for the right piece of audio.
Track labels: DX (Dialogue), FX (Hard and Soft Effects), and MX (Music)
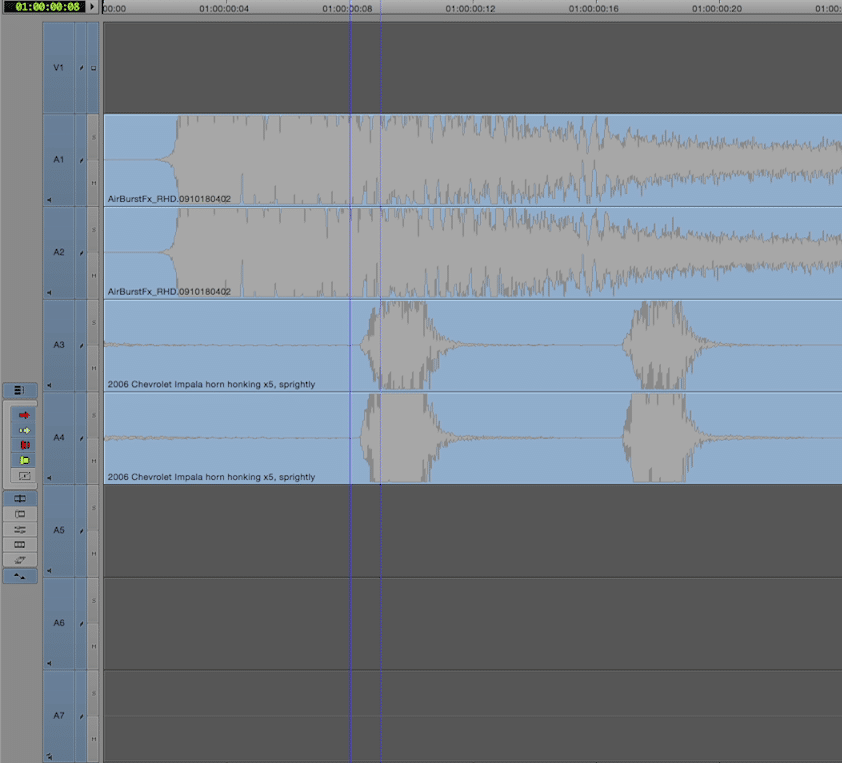
What should also be done is to adhere to odd-even pairing. This means putting stereo tracks on tracks 1 and 2, 3 and 4, and so on.
Correct audio track layout: odd-even pairs
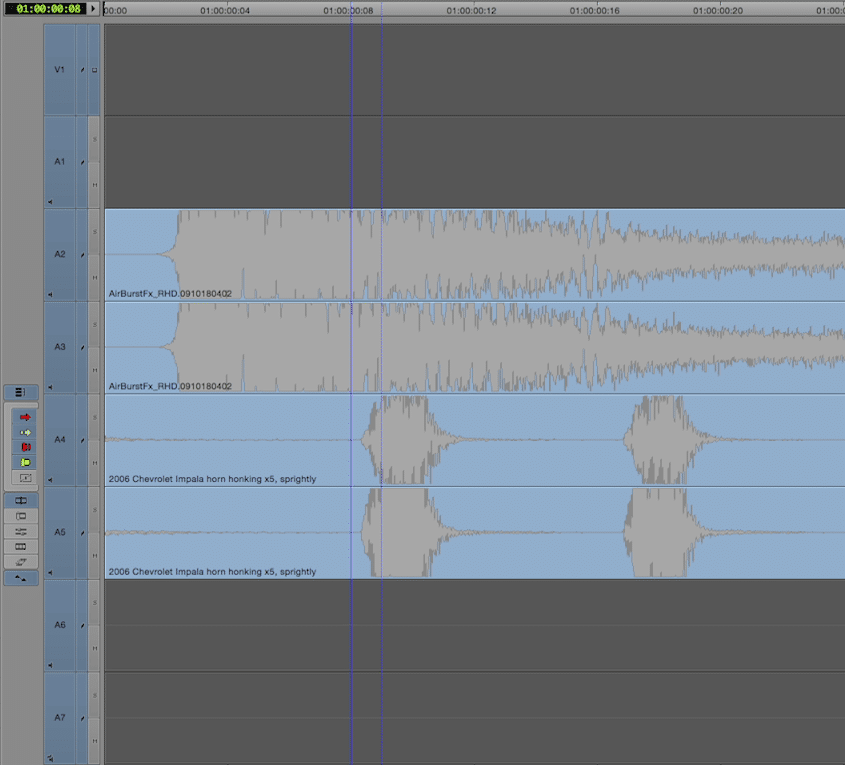
Avoid even-odd pairings, such as tracks 2 and 3, and 4 and 5.
Incorrect audio track layout: even-odd pairs
This also includes not putting mono files on stereo tracks.
As an aside, nothing is wrong with having stereo tracks and mono tracks in the same sequence.
Lastly, if you process or render any audio files – whether you send them to another application, or simply apply a permanent effect, don’t forget to leave the original on the timeline with the volume down or muted. If you export the sequence for post sound and have rendered effects, the sound folks are then stuck with your permanent mix, which may need to be changed down the road. It’s like you getting a compressed video and having little way to get back to the original file. In fact, many audio folks will simply skip your effects entirely by ignoring them when importing them into the audio session.
Help the entire project out and keep the original around. Be cautious when using tools like Plural Eyes to sync audio, often using this tool to sync second system audio can remove the original audio for the scene....and your sound folks may need access to that.
2. Video and Audio Sync
Sync, sync, sync. You fickle mistress. Sync is a problem that will have you chasing your tail. Here are a few things you can do to ensure your sync is spot on.
First, is a head pop or a two pop. I’m sure you’ve all see the countdown to 2 before.
History lesson: It used to be used when audio existed on magnetic tape stock, and the picture was on celluloid. Getting these 2 mediums to proper and consistent playback speed could be challenging, so this countdown – called the academy leader – was placed ahead of the film. The audio – a single frame long 1kHz tone – was placed on mag stock to be audibly heard for 1 frame when the picture showed a frame of 2. If the tone and frame of 2 didn’t match up, something was out of sync.
Next Episode
The 5 THINGS Webseries Workflow
You can follow along with these two workflow documents:5 THINGS Post Production Workflow PDF5 THINGS Distribution Workflow PDF
1. Pre-Production
5 THINGS sprang from my love of technology, but also the realization that the proliferation of creative tools has clouded the understanding of much of the underlying reasons for that technology. I also knew that this was a niche concept in a niche market, so I’d have to go it alone, so much of the workflows behind 5 THINGS come from me.
First, it starts with coming up with an idea. Something that not only interests me but is also a hot topic in the industry.
I also consult with Moviola, who has sponsored the series this season and also premieres the episode as a webinar once a month. Moviola wants to ensure that the episode topic is relevant to their viewers, so that gives me some framework to ensure the episode is applicable. The one webinar a month paradigm also gives me a timeframe to plan production and post-production by.
It’s then brainstorming time, writing out the 5 major questions of the video, along with ideas for b-roll for each point.
I have a word doc template that I then begin to populate with the ideas in a narrative and conversational fashion. I then simply start dragging my knuckles across the keyboard and grunt approvingly as the episode starts to take shape. This is what will become my script and teleprompter feed. Because much of what I talk about is reliant on exact speeds and feeds, it’s important that my tech info be as correct as possible, so I traditionally don’t ad-lib the episode as much as I’d like.
It’s also at this point that I’ll call on some industry friends – other creatives and technologists, and sometimes manufacturers, to discuss some of my viewpoints to ensure the info I’m pontificating on is accurate.
Lastly, it’s time for the cutaways. Being raised on media, quite often my normal thought process recalls clips from movies and tv shows and many of the cutaways are simply a natural extension of my cognitive process. I can’t help it, it’s how I’m wired.
Put all of this in a blender, and I get six to ten pages of tech goodness.
Now, it’s time to shoot.
2. Production
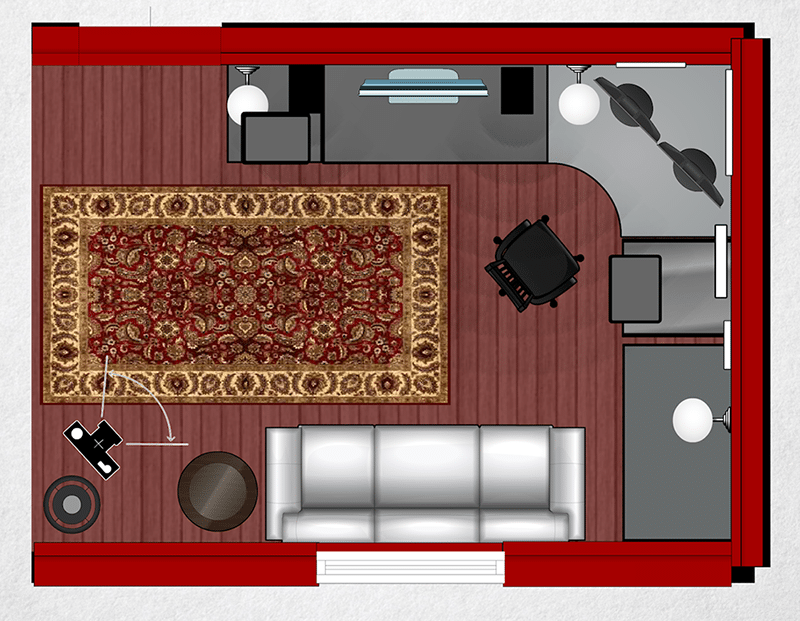
I shoot 5 THINGS at my home office. A modest 13×13 room that allows me to do 5 THINGS on nights and weekends. However, a room of this size does present some challenges.
13′′x13′′ room layout; camera and light at bottom left.
First, let’s start with the look. Given the shortness of the room, having multiple cameras set up would be tricky. So, I decided to shoot with a 4K camera, and release in HD. This allows me to have a medium shot and a close-up from one camera. This also means my production lighting requirements were reduced, as I didn’t need to take into account lighting for other angles.
I wanted a shallow lens for a little bit of bokeh; a traditional video lens would have most everything in focus, and the frame would be very busy. The Sigma 1.8 18-35mm was a great choice. It’s also a fast lens so I don’t need a ton of hot lights in a small production space.
So, I needed a camera that could shoot 4K, and had removable lenses, and wouldn’t break the bank. I choose a Blackmagic Design Production Camera 4K.
Next was the teleprompter. Given the small size of the camera, and the less than constant use, I choose a modest prompter – the Flex Line from Prompter People. Easy to set up, and lightweight so I didn’t need a heavy-duty tripod. It’s also adjustable and had a large enough monitor that I could plug my laptop into it and run the prompter. Prompter People also has the Flip-Q software to run the teleprompter.
Prompter People also has a sister lighting company called
If you like this episode you’ll love


Episode Comments
Generate a badge
Get a badge for your website that links back to this episode
<a href="https://goodpods.com/podcasts/5-things-simplifying-film-tv-and-media-technology-audio-only-263286/the-truth-about-video-editing-software-in-hollywood-31196477"> <img src="https://storage.googleapis.com/goodpods-images-bucket/badges/generic-badge-1.svg" alt="listen to the truth about video editing software in hollywood on goodpods" style="width: 225px" /> </a>
Copy